How to change Network type Public to Private?
Let’s go through a few methods to change the network type in Windows 10.
1-
Using Windows Settings
To change the network type using
Windows Control Panel settings, follow the steps below:
1.
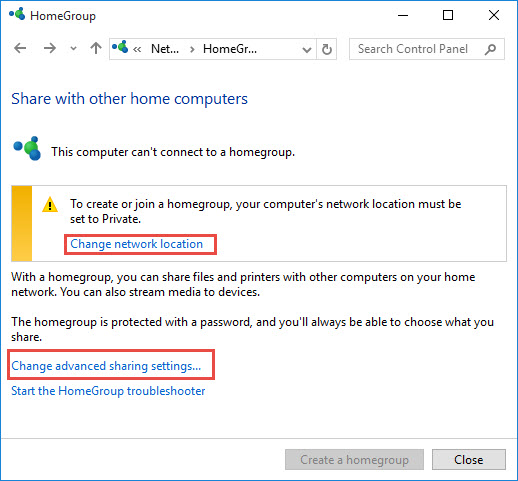
Go
to Control Panel –> Network and Internet –> HomeGroup
2.
Click
on Change Network Location link.
3.
This
will open a charms dialog asking you “Do you want to allow your PC to be
discoverable by other PCs and devices on this network”.
4.
Press
the Yes button if you want your network to be set to Home or Work and No button
if you want to be in public network.
2-
Setting network type using Windows Registry
If you are an advanced user and are
comfortable with editing Windows Registry, this method will be easier for you
to change the network type especially when you want it to be done on multiple
PCs using just a single registry file.
1.
Go
to Run –> regedit
2.
Go
to the following key:
HKEY_LOCAL_MACHINE –> SOFTWARE –> Microsoft –> Windows NT –> CurrentVersion –> NetworkList –> Profiles
HKEY_LOCAL_MACHINE –> SOFTWARE –> Microsoft –> Windows NT –> CurrentVersion –> NetworkList –> Profiles
3.
Under
the Profiles key, you will find some sub-keys with different GUIDs. This
corresponds to the no. of network cards you’re using with your computer.
4.
Select
each sub-key of the Profiles and look for the Profile Name key in the right
hand pane. This will give you the name of the network so that you can easily
recognize which network you want to change.
5.
After
identifying the right sub-key, you can change the Category DWORD value in the
right hand pane to change the network type of that particular network.
Value data can be 0 for Public network, 1 for Private network and 2 for Domain network.
Value data can be 0 for Public network, 1 for Private network and 2 for Domain network.

1.
Go
to Run –> secpol.msc
2.
Select
Network List Manager Policies. This will list all the networks in the right
hand pane.
3.
Double
click your desired network, go to Network Location tab.
4.
Change
the Network location type to either not configured, private or public.
5.
If
you want to do this for all the connected networks, you can double click All
Networks instead of your desired network.

Open PowerShell with administrative
privileges
1.
Run
the following command:
Get-NetConnectionProfile
Get-NetConnectionProfile
2.
See
the network name you want to change its type and run the following command:
Set-NetConnectionProfile -Name “ITT” -Network Category Public
Where ITT is the name of your network and you can change the -Network Category switch value to Public or Private.
Set-NetConnectionProfile -Name “ITT” -Network Category Public
Where ITT is the name of your network and you can change the -Network Category switch value to Public or Private.


Comments
Post a Comment